Thursday, June 27, 2013

Favorite (And Least Favorite) Commercial Patterns

 I don’t use commercial patterns all too often, especially for cosplay. I really try to make cosplay straight from scratch but sometimes I do use patterns. Especially for bodices.

Favorites
I don’t think I’ve actually made a blouse of any nature from this I’ve just made dresses! But they fit really well once I made a few slight adjustments to the pattern itself.

Image from patternreviews.com
Simplicity 3637
I use the bodice for this a lot but that’s because it fits me really well since I don’t have much curves up top. It’s a favorite for lolita dresses but is my go to for any costume that needs a square neckline or to be stupid fitted to my torso.

Image from patternreviews.com
Simplicity 4381
Best. Basic. Pants. Pattern. I use it for all pants and bloomers I make. Love love love it.

Alright
Simplicity 9613 (Vintage)
Alright but so similar to M6035 that I just use that one now.
I’ve only used the cape pattern from this but it worked well for my Riddler hench cape.

Not a Fan
It just doesn’t go together well and it is hard to not have your undergarments showing.

Least Favorites
This one doesn’t fit well at all, with period undergarments or without. Either it is designed for someone with very strange dimensions or something happened during printing. This wasn't one that could be saved with some alteration, it gave me a completely unusable garment (thank goodness I tested it in muslin first!).

Thursday, June 20, 2013

Book Review: How to Cosplay volume 1


Cosnote (2009). How to Cosplay. Graphic-Sha. ISBN: 9784766119602

As the title says, this book is about teaching you how to cosplay. Volume 1 has a make-up focus and has tutorials for all sorts of make-up things. It's a good book for not only beginners but also intermediate level cosplayers.
It starts with basic tutorials like how to apply foundation.
Then progresses to all manner of sculpting the face using make-up placement.
And the last tutorials are for things like making and applying scars, bullet holes, webbed fingers and even how to do decent looking body paint.

Then after the tutorials there's convention reports with cosplay highlights. They interviewed the cosplayers too and found out character/series and (what really interests me) cost. It's super cool seeing what $100 in materials can get you in Japan. All of the conventions were in Japan but they did have a cool four page spread on World Cosplay Summit 2008!

The very last pages are adverts for cosplay related things like premade costumes, make-up and wigs.

This is a really cool book, it's got photo shoot pictures all throughout in addition to the pretty good tutorials. The only things I didn't like were that all of the products listed in their tutorials and advertisements are from Japanese suppliers. Make Up For Ever you can get Stateside but a lot of other things you can't. The other things I didn't like were their white and grey body/face paint tutorials because their finished results were uneven and splotchy! On the grey face paint one in particular they missed the bottom of the nose and several other small areas completely! But aside from those minor issues I think this is a solid book.


Sadly volumes two and beyond appear to be incredibly rare and I can't find them either in WorldCat (I try to get these review books through Interlibrary Loan because when they're free I can review more and see which ones I like best) or Amazon. :(
8/10 Lots of very solid tutorials and cool convention cosplay summaries. The photos are well done and the layout is very nice too. Loses points for a few bad tutorials. Did not lose points for showcasing make up that Japanese cosplayers would have easy access to since this is a translation of a Japanese text.

Monday, June 17, 2013

Costume: Knockout

Knockout is sassy. I think we'd had maybe two episodes with him when I decided I wanted to cosplay him and we hadn't seen just how sassy he even was then. But oh if there was one fictional character I'm like it's probably Knockout. I'm vain, cannot stand to be seen unless I'm fabulous, love racing and cars and can hold a fierce grudge. I can also put together a snappy come back or one liner every so often too. :) I love how shiny he is and I love all the detailing that gets to shine through since TF:P is down with 3D models. There's just so much detail I can add in!

I was also very lucky in that my BFF Forever agreed to make Breakdown (Knockout needs his Breakdown, who else could possibly buff him? *sobs*) and we were just freaking fabulous. We even made it into a slide show on the front page of Popular Science!

One of these days I will actually get around to putting together a proper work log for Knockout, I have a folder of in progress pics and there was definitely some trial and error that those who come behind me can learn from.

My favorite thing about this costume is my most prominent deviation from his standard design. Because the tribal flames he has along his doors are hideous I thought I'd do a specialty deco. In the racing world there's this cool kind of specialty deco where people sign and doodle all over it. I thought a cool souvenir would be to have people, be it friends or celebrities, sign or doodle on the doors. I'm really happy with how the deco looks and even happier with the memories represented by those signatures and doodles. :)

 Series: Transformers: Prime
Construction Time: 4 months
Cost: $236.57
Materials and Construction: Spandex, Satin, Craft Foam, Foam Board, Balsa, Spray Paint, Assorted Plastics, Hot Glue Log
Design Sketches: Log
Debut: Botcon 2012
Final Appearance: Still in Rotation

Costume: Yuna

Oh Yuna. She's probably my favorite Final Fantasy lady (Reeve Tuesti is in fact my fav Final Fantasy dude) though Shelke is a close second. She's so dignified and amazing. I just knew I had to cosplay her since in all honestly I wanted to be her. She's really the first character where that's been the case; I like the characters I cosplay and think most of them are cool but I wouldn't necessarily want to be them. Also her skirt is just freaking beautiful.

I, of course, made this realization about a month before San Diego Comic Con 2012. I'd just finished the game and I knew I had to cosplay her. Given how much detail and just how many things she wears I knew a month would be pushing it but as soon as I got back from Savcon I started on her (I remember this because I remember fabric shopping with my BFF Forever before she continued her return trip out West from that con). Luckily there's been like ten years for amazing cosplayers on the Internet to figure out amazing ways to make Yuna costumes so there was a lot of good ideas for some of the crazier aspects (mainly that obi bow).

She's one of the few costumes I really enjoyed making, while all that floral detailing was murder on my back I enjoyed painting it and I really love that design. When I retire this version I plan on making the skirt into a dress I can wear or using it as a quilt back since I really do love how that pattern came out.

But yes I am remaking Yuna. I plan to start sometime after San Diego Comic Con 2013. I doubt the fully redone version will be done for A-Fest but parts will be.

Things I plan to improve:
Skirt: needs a fabric more suited to pleating, make the pleats shallower
Obi: Don't rush the floral painting and use a paint that doesn't clump as much Also see about making the bow larger/more prominent
Shirt: Try rayon/lycra to see if that sits better
Sleeves: Maybe remake, depends how worn out they look after SDCC

I'm technically on staff version 1.5, I was in a rush for A-Fest so I ended up making the head out of cardboard since the plastic I'd bought hadn't worked out. It looked alright in photos but was only a temp fix. For Anime Matsuri I decided to get it spiffed up. I carved the head assembly from glued together balsa planks then coated it in fiberglass resin. I also had a friend saw it into three parts, I wanted the head and the brownish bottom part to screw off so I could fit it in my luggage for SDCC 2013 since I'm flying this year. I even found mascara tubes that screw together and perfectly fit inside the broom handle I'd used as the base of my staff. Sadly the epoxy I'd used to affix said tubes degraded their plastic so one unfortunate dropping of the staff later and the connector for the staff head was shattered (and part of the staff head chipped, fiberglass resin needs fabric/fiber to be strong apparently). I was able to hot glue the head to the staff and I've filled in the chipped bits but I'm not happy with this staff. I plan to make one of her other ones to replace this one. I also plan to make one of her arm shield things too. :)


Series: Final Fantasy X
Construction Time: 2 months
Cost: $190.64
Materials and Construction: Log
Debut: San Diego Comic Con 2012
Final Appearance: Still in Rotation

Costume: Arcee 2.0


Third times the charm? Right? The plan was to just use my pattern from Arcee 1.0 and replace the broadcloth with jersey this go... But then I started staring at my worn pictures next to official art...

user posted image

I really wasn't happy with how she looked or how she wore. The only pattern bits I kept where the back kibble (changed up the attachment system) and parts of the helm. I also reused the mask from Arcee 1.0 partly because I thought that turned out really well and partly because I liked the idea of have part of old Arcee with my new Arcee.
Here's the design sketches, not much but she's a fairly straightforward costume.

All in all I'm really happy with how she turned out, I slightly messed up on the fitting in the shoulders but it's hardly noticeable. I think the only thing I'll end up changing on her is the pink stripes on her helm, I didn't realize how 90 degree angle they look in photos since they're supposed to be at a different angle.

She's really comfortable to wear though, the shoes tire my feet out a bit (five inch platform wedges that are a size to big do that) but I can get in and out all by myself and move about without a spotter which I enjoy. I've also gotten better at posing. :D


Series: Transformers: Animated
Construction Time: 3 months
Cost: $137.31
Primary Materials: Rayon/Lycra, craft foam, foam board and hot glue. Full Log
Worklog
Debut: Botcon 2012
Final Appearance: Still in Rotation

Sunday, June 16, 2013

Costume Planning: Knockout

Since there was a LOT of planning and plotting that went into how to make this guy work it requires it's own post unlike all my other projects which just had one or two sheets that I could put on the costume's post.

So, onward!


As you can see, the theme for this guy was layers. Lots and lots of layers.

Saturday, June 15, 2013

Materials and Spending Log: Yuna and Summoner Staff 1.0/1.5

Costume Cost: $85.46 ($96.15 including lost materials)
Staff Cost: $94.49
Total Cost: $190.64

Costume:
$29.46 Wig
$4.54   Wig Head
$6.50   Swim Top, Black
$.54     1/4 yd Flannel, Pink
$13.54 Joann's Paint and Dye trip #2
            -Dye, Petal Pink
            -Fabric Paint, Royal Blue
            -Fabric Paint, Holiday Green
            -Fabric Paint, Yellow
            -2 yd Broadcloth, White
$3.24   1.5 yd Broadcloth, White
$5.40   1 yd Linen, Yellow Amaretto
$10.12 3.75 yd Broadcloth, Dark Royal Blue
$1.60   2 yd Cord, White
$.64     Velcro, Beige
$1.07   Plastic Canvas, Clear
$4.33   Bead Strand
$2.13   Interfacing
$2.35   Interfacing, Craft Weight

Lost Materials:
$5.61   Fabric Paint, Glacier White
$1.55   Fabric Paint, Holiday Green
$1.55   Fabric Paint, Cool Blue
$1.98   Pink Dye


On Hand:

Staff:
$15.09 Fiberglass Resin
$2.68   Fiberglass Hardener
$3.78   Spot Putty
$8.65   Lacquer Thinner
$4.30   Block Sander
$2.13   Wash Tub
$3.24   Brushes
$3.78   Masking Tape
$10.70 Poster Frame
$12.99 3 planks 1/4" Balsa
$12.99 2 Mascara Tubes
$1.64   Spray Paint
$3.97   Spray Paint, Periwinkle
$3.97   Spray Paint, Gold
$3.54   Spray Paint, Brown
$1.04   Spray Paint, Navy
On Hand:

Materials and Spending Log: Knockout

Total Cost: $204.09 ($236.57 Including failed prototype materials)
$64.50 Spandex World (Same order as Arcee 2.0)
            -4 yd 4 way Spandex, Metallic Red
            -1 yd 4 way Spandex, Metallic White
            -1 yd Rayon Lycra, Gunmetal
$26.07 2 yd 4 way Spandex, Metallic Pewter
$12.93 1 yd 2 way Spandex, Metallic Silver
$10.54 1 yd Stretch Satin, Bordeaux
$8.66   Tshirt, White
$33.98 32 sheets 3mm Craft Foam, various colors
$2.15   Foam Pirate Hat, Black (base of helm)
$4.27   2 Foam Board, White
$1.15   Poster Board
$6.16   Balsa
$9.50   2 bags Hot Glue Stick, Hi Temp
$2.15   1 pk Twill Tape, Black
$1.07   Center Release Buckle
$.53     Velcro, White
$3.97   Spray Paint, Metallic Silver
$2.49   Sharpie, Silver
$3.21   Tiny Nails
$1.07   Novelty "Diamond" Rings (for headlights)
$3.21   Machine Screws
$6.48   Testor's Model Paint, Black Window Tint

Failed Paint Materials
$16.24 2 cans Automotive Spray Paint, Burgundy
$16.24 2 cans Automotive Spray Paint, Clear Coat

On Hand
Shoes
Papercard
Plastic (Windows)
Zip Tie, Black
Stockings, Black
Stocking, Beige
Ribbon, Red Glitter Velvet
Spray Paint, Gloss Black

Spending and Material Log: EDI

EDI 1.0
Cost: $115.65 ($154.55 total)

$24.00 2 yd 4 way Spandex, Metallic Silver
$12.00 1 yd 4 way Spandex, Metallic Black
$12.00 2 yd Rayon Lycra, Charcoal
$13.86 Shipping, SpandexWorld
$21.64 Bra, Black
$3.24   1 yd Vinyl, 12 gauge
$5.38   1 pk 2mm Craft Foam (4 sheets used)
$1.93   2 sheets 2mm Craft Foam
$2.45   26" Sport Zipper, Nu Grey
$1.77   22" Invisible Zipper, Nu Grey (not used, too short)
$1.07   Velcro, Black
$5.40   Vinyl Glue
$4.91   Duct Tape (for head double)
$2.01   Bottle of Coke (Visor)
$3.99   Eye Shadow, Silver Lining

Other Costs:
$39.90 Shoes (Tobious Cosplayous bought)

On Hand:
1/2 yd 4 way Spandex, Metallic Pewter
Neoopaque Paint, Black
Lumiere Paint, Pearlescent White
Hot Glue Sticks
Thread, Sharkskin Grey
Paint Brushes and Trays
Plastic Bags (to stuff head double)
Orange Sharpies
Rayon Lycra Scraps, Black
Cream Face Paint, White
BB Cream
Eyeliner, Black
Eyeliner, Silver
Lipstick, Silverwitch
Face Powder, Translucent
Eyeshadow, Gunmetal
Cosmetic Brushes

EDI 1.5 Upgrades
Updated total: $217.05 ($256.95)

$80 2 yd custom printed spandex
$7.30 Snazaroo light grey face paint
$2.50 Snazaroo white face paint, refill size
$3.25 Covergirl eye shadow in Silver Lining
$8.35 Ben Nye setting spray
$3.67 Butt pad

On Hand:
Black craft foam
Print outs of the gun
More thread
More hot glue

Spending and Material Log: Arcee 2.0

So, since I actually keep almost all my receipts and tend to be able to remember what of my on hand stuff I used I thought I'd log that for my own records. See how much actually went into these beasts. Then I realized I would have loved to have gone through someone's materials and spending log when I was just starting out (I still would, I love finding out how other people do things~) so I'm going to type up the ones I have. Only my most recent costumes have these so far but I'm going to try and do them for all future costumes (not including Schwarz since I've somehow lost ALL of his receipts). All amounts include tax (.0825 here) as well.

So first up, the pink bot. My second pink bot.
Total Cost: $137.31

$40      Spandex World (same order as Knockout)
            -3 yd Rayon Lycra, Hot Pink (about 1yd left over)
            -2 yd Rayon Lycra, White (no leftovers)
$22.61 26 Sheets 3mm Craft Foam, various colors
$1.60   2x Velcro, White
$4.27   2x Foam Board, White
$.54     Poster Board, Black
$.54     Poster Board, White
$2.58   1 pck Twill Tape, Black
$4.79   1 bag Mini Glue Sticks, Hi Temp
$3.02   Thread, Hot Pink
$9.72   Boots, Kelis Wedge from Target
$6.50   Leggings
$41.14 Spanx

On Hand:
Mask from Arcee 1.0
1/4" Elastic, White
Leather Gloves, White
Scoop Neck Leotard, Black
Rayon Lycra, Black
Autobot Vinyl Decal

Costume Planning: Kasumi ME2

The main thing is I'd make it primarily a body suit (It would be a bodysuit, shoes guantlets, elbow pads, gloves and hood). I wouldn't actually make that beige turtle shell looking bit completely out of foam because that would make it harder to move in but you could use 2mm craft foam wrapped in the fabric instead and glue that to the bodysuit in place of sewing that on. It'd still be part of that 3rd layer though. If you were to make it out of covered foam then don't extend the top of the front all the way to the shoulders, just make it long enough to sit under the hood. That way there is some stretch still available in the shoulder area for if you stretch yourself out. Sitting could also be problematic, you could probably do it but you might pop a glue seam. For the beige lines on that bottom layer I'd really consider getting fabric printed at spoonflower with the proper designs, they do stretch. You could paint them on but lemme tell you that's gonna be a couple days of your time and at least a full day of someone else's since you have to wear the bodysuit while painting it. Neoopaque paints from dharma trading work really well on stretch fabrics. And I think that's it.

Thursday, June 13, 2013

Book Review: Cosplay in America アメリカのコスプレ

Chuang, E. (2010). Cosplay in America. Ejen Chuang. ISBN: 978-0615349060
Another "Overview of Cosplay" type book but I will say right now that this one is doing it right. The photos don't always show great details of the costumes but the poses give them life. Where as Fandomania felt cold and detached and depressing all the shots here feel alive. Even if someone is clearly awkward the poses and shots themselves do well to downplay that.

The photos feel respectful.

Reading the forward it becomes clear why the photos feel respectful, because the photographer does respect the subjects. The foreword also tells us about the photographer, why he decided to do this and about his method including when and where these photos were collected from.

This is a dual language book, both in Japanese and in English which I think is cool. While never overtly stated I think maybe the reason behind this was so that maybe our cosplaying counterparts on the other side of the Pacific could see the essence of アメリカのコスプレ (American Cosplay).

Occasionally the photos have anecdotes attached, some range from "okay kids can be weird" stories of glomps to yaaaay moments like the one above where some girls came up to this cosplayer after she took her helmet off because they thought it was so cool a chick was being all badass in armor.

The subjects in this book feel very alive. These are clearly poses chosen to highlight the character.

Or the poses are a bit silly and more of the cosplayer than the character.

Either way, if I was asked to show someone, whether a professor or a parent, what cosplay looked and felt like then this would be what I would show them. It does well to capture the fun and life that is cosplay but it also presents it professionally.

8/10 (Lost points for not listing who the character themselves were or what series they were from and there were a few typos in the foreword)

Book Review: Fandomania: Characters and Cosplay

Dorfman, E. (2007). Fandomania: Characters & Cosplay. Aperture. ISBN: 978-1597110358
When I first saw this book on Amazon I thought that it looked neat. It was sold as a book featuring shots that are just cosplayers, no fancy backgrounds, no props, no fancy posing. The focus is the costumes and the people who made their costumes. I naturally interlibrary loan'd this in a heartbeat. I'm really glad I didn't buy it.

The first thing you'll notice is that the cover is craft foam. I used identical pale blue craft foam in my EDI costume, needless to say this is a really fun idea for a book on cosplay.

Inside the book is a short, few page essay written by someone who wasn't the photographer, apparently a random art critic. Okay. Weird. But whatever. Reading the essay intro thing I now kind of understand where a good number of people might have gotten the idea that cosplay is really just fetish wear that people put a good bit of effort into making. It mentions how clearly cosplay is just young people exploring their identity, sexual and otherwise.

If people want to cosplay and have it be a fetish thing, that's fine. I just don't appreciate someone labelling all of cosplay as something like that. Also early in the essay it mentions how this book purposefully goes out of it's way to not be condescending or treat the subjects like freaks but the essay itself does and going into looking at the pictures after gives a distinct freak show vibe to the whole thing.

So going in to the meat of the book I've already been put in a 'this is going to be a freak show?' mind set and from some of the preview pics from Amazon I knew that the posing would get a bit awkward at times.

How, exactly, does this showcase the cosplayer? There were a few instances where the posing wasn't awkward it just made for a straight up bad photo. There's only hints at details shown here. Either a full side or some nature of front shot would have captured the detailed bits of the costume better. I want to see the details of her costume! I thought we'd get those weird model casting shots of basically from the front quick snaps. Something not posed and not artificially artsy. I was very wrong. All of the photos are taken either from "artsy" point of views or the posing feels incredibly awkward. A number of the poses felt like clearly these were shots the photographer took between the cosplayers actually posing. Looking at the pictures there's a number that just make me feel sad. The disjointed and awkward between frames posing just gives the whole thing a feel of melancholy.

The other main issue is that a number of the subjects that are photographed are not in fact cosplaying. I chose this particular one for the specific fact that in the information section this is listed as "Character: Original". That's it. All of the other fan or original characters at least came up with a name for their not part of any canon character or a descriptor (ie "Character: Gothic Lolita"). Now if this book was just trying to represent people you see at conventions that'd be different but it isn't. The book specifically states that it is giving a look at cosplay in the title and in the foreword.

At the very end of the book is a list of each of the people in the book, who their character is and what series they're from when that applies. I appreciated it since I was able to confirm some of the characters I thought some of the people were.

The final thing I have to say about this book is that it fails to mention where these photos were taken. The foreword implies they were taken at a convention but no specific convention or even a year is given. If the author was really trying to make this seem like a legit cross section of the cosplay world then they should have included where and when the photos were collected but that's the thing. This book stated it wanted to give a genuine, distilled view into cosplay that wasn't a "look at these freak show kids", a view without the artifice of posing or props or backgrounds but in purposefully choosing particularly awkward shots that's the exact feel they got.

If you want to check out this book then go for it but if you're doing a paper/thesis/any sort of meaningful research into cosplay this is a total waste of time.

3/10 (would have been lower but the craft foam cover is boss)


Costume: Madame du Pompadour

After adding grommets for lacing and improved panniers, 2014
A very fun costume, I made the skirt a little short by error but it came in very handy when running through the Gaslamp District on a Flynn Lives mission! I made proper panniers and replaced the zip in back with grommets so I can lace it really tight so it looks less baggy and also redid the skirt. Now to get pictures one day!
First time I wore it, back when it had a zip.
Series: Doctor Who
Construction Time: 2 weeks
Cost: ?
Materials and Construction: Home Decor Brocade, lace, really wide lace, grommets, blue broadcloth, steel boning, gold ribbon, striped ribbon, blue dye, yet more lace, cream ribbon, pearls, pearl earrings, a corset (homemade) and loooots of hairspray
Debut: San Diego Comic Con 2009
Final Appearance: Still in Rotation

Costume: Space Paranoids! Sora

 
The keyblade I made was a fan design, my theme was Latin Kingdom of Jerusalem (I'm a history major/nerd). It sadly got destroyed in a move. I had fond memories of that hanging proudly in my living room.
Series: Kingdom Hearts 2
Construction Time: 2 months
Cost: ?
Materials and Construction: Unitard, navy blue dye, broadcloth, newspaper, glue, cardboard, hot glue, navy spray paint, hairspray, brown wig, craft foam, velcro, gloves, grey tank top, navy socks, sneakers, duct tape, reflective tape, hot glue, face paint, loooots of eye shadow. Keyblade: Dowel, wire, craft foam, paperclay, acrylic paints, ribbon, silver spray paint, craft gems, newspaper, bracelet, gold spray paint, hot glue
Debut: ALA 07
Final Appearance: A-Kon 2009

Costume: Yachiru

 
If only I hadn't gotten taller like a month after I finished it. :/
 
Series: Bleach
Construction Time: 2 days
Cost: $20
Materials and Construction: Broadcloth, toy katana, flip flops, tabi socks, wig, craft foam, plastic sheeting, silver spray paint, sharpie
Debut: Anime Expo 06
Final Appearance: Anime Expo 06

Costume: Gracia Hughes

Series: Fullmetal Alchemist
Construction Time: One week
Cost: ~$60
Materials and Construction: Broadcloth, wig, prepurchased blazer and shoes. Doll Elysia is made from an unstuffed doll body, children's jacket and shoes, broadcloth (dresses), embroidery floss, stuffing, chenille yarn
Debut: ALA 06
Final Appearance: Ikkicon 2009, needs repairs

Costume: Plant Pretear

Young and derpy and couldn't apply make up to save my life. She was the first masq I ever participated in and while I didn't win it was a good learning experience. :)

Series: Pretear
Construction Time: 5 days
Cost: ~$60
Materials and Construction: Wig, headband, Quilter's Cotton, muslin, Modge Podge, craft foam, craft gems, safety pin, flat shoes, pantyhose, floral vine, iron on interfacing, cream acrylic paints, bias tape
Debut: Anime Expo 2006
Final Appearance: Still in rotation! I just never wear it.

Costume: Lolita!Dante


It was about 2 weeks before Anime Fest that I finished Devil May Cry 4 and I had an absolute burning need to cosplay from that game. But with two weeks to my next convention I knew I wouldn't be able to make something from scratch since all the characters have delightfully detailed models. I honestly don't remember what prompted me to dig through my closet to make a closet cosplay but I do remember that once I was pulling things out I knew I'd be able to do a rocking lolita version of Dante (he's my fav character of possibly all time, and he was just soooo ridiculously good looking in 4).

I squeed when I saw this fountain, it looks straight out of Fortuna!

The props and "buckles" are the only things I made, everything else was literally pulled out of my closet. I knew I would need props to really make it obvious who I was so I settled on Ebony (I had a really good toy gun, just had to paint the grip and gold pieces) and Pandora. I only decided to do Pandora since I couldn't find a good enough gun to be Ivory and I lucked out and found enough things to cobble together a Pandora. Pandora is made from: A briefcase, matte black spray paint, shiny black acrylic paint, silver spray paint, duct tape (the bit around the head) part of a Halloween door knocker and the edges of some picture frames (the silver corner bits). I think it cost me maybe $20. There's still some detailing I'd like to do (the yellow glow painting). Oh and the "buckles" I used to cover the buttons on my vest are just the cork caps from various sparkling wines that I glued to freebie buttons from last SDCC.

And yes I did my best to get as many pics with pizza and pizza related things as I could because Dante/Pizza is my OTP.

Series: Devil May Cry 4
Construction Time: 3 days
Cost: ~$20
Materials and Construction: Closet Cosplay
Debut: Anime Fest 2012
Final Appearance: Still in rotation!

Costume: EDI


Series: Mass Effect 3
Construction Time: 2 months
Cost: $115.65
Materials and Construction: Rayon/Lycra, 4 way Metallic Spandex, Fabric Paint, Hot Glue, Sport Zipper, 12 gauge vinyl, vinyl glue, Heelless Shoes (modded), Craft Foam, Velcro, Bra, Soda Bottle, Face Paint, Loooots of Eye Shadow Log
Debut: A-Kon 24 (2013)
Final Appearance: AnimeFest 2013 (then it evolved to EDI 1.5)
EDI is a first for me. I've done robot cosplays, I've done body suits and I've worked with all these materials before but this is the first time I've done a cosplay simply because someone asked me to do it without really knowing much about the character or series. The only other time I've ever done a cosplay because someone asked was Gracia Hughes and even then my friend who was going to be Hughes never did it and I was a huge fan of Fullmetal Alchemist and Gracia. While I'd heard of the Mass Effect series I'd never heard of EDI or played any of the games. Needless to say I was hesitant since it'd be investing a lot of work into a character I didn't know. But the design was neat and would be a fun challenge and the YouTube videos I could find of in game scenes with EDI made her seem pretty cool. So I struck a deal, if he'd buy the shoes necessary for the costume I'd do it. I really only had $100 for this year's costumes and I knew the shoes would put me over that. I sent him an eBay link a few days after A Mat and had the shoes soon after.
I had originally planned to make EDI in a month (April) since I had a secondary job bid lined up for May and I needed this by A-Kon (end of May). Due to health issues I didn't have much crafting time in April but the job I'd planned to do in May got pushed back to after summer so I spent most of my May working on her and finished her in the hotel room the Thursday night before the con officially started.

As for major design features... The helm is constructed primarily of 2mm craft foam which I then covered in 4 way spandex. It's a two piece construction, the top pewter portion with the ear covers and visor and then the under structure which is covered in silver. It wasn't terribly difficult, just a lot of finessing to get all the lines and covers as smooth as possible. It also has a chin strap to hold it as close around my face as possible. The bodysuit is almost completely one piece, the gloves velcro on and the larger vinyl overlays also velcro on but otherwise I'm literally just getting zipped into a bodysuit. I'm really happy with that, everything stayed in place fairly well excepting some of those vinyl overlays which weren't attached. Covering the cups of the bra in spandex was a total pain but it worked out very well and with the straps of the bra being built into the suit it helped to support all that foam and such that was glued to my chest.

And here I am with the Jeff Moreau cosplayer who asked me to do EDI. You have no idea how hard it was to not bust out laughing during some of these pictures. The most hilarious part of this shot is that I'm "picking up" the crippled sickly character with my irl crippled arm.

This costume was a serious hit at A-kon, I completely wasn't expecting it. I got so many compliments on the construction it really made my con. I had a number of people ask if they could take shots specifically of my shoes! I've started playing Mass Effect too (so much fun, I may be falling in love with Garrus or as I affectionately call him, Mr. Kitty Face) and I really look forward to meeting EDI in game. She seems pretty cool in YouTube videos of scenes but I look forward to having my Shep chat her up. :)
Edi's Folder
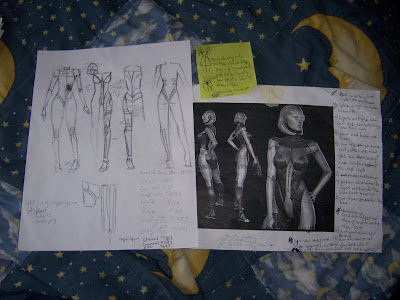
Here's all my paper stuff for EDI, so most of the receipts, a spending log sheet, reference photos that I worked off of (b/w) and reference photos for if I want to enter a contest (color) as well as my design notes.


Edi didn't have too too much in the way of design sketches, just that main one sheet I did at Anime Matsuri when asked to do EDI (mainly to see if I could figure out if I could do it) and then a post it note I doodled on when I got some inspiration at work. All that text written on that reference image was also thought through at work and made sure to write down so when I went home to work on her I'd remember all the good ideas I'd had.
This costume involved the most outside help out of all of mine, simply because I cannot paint my own back, luckily I had the wonderful Natsume Ryu to help me out on that after we got our hotel room.
There's a few things left to do/redo:
Finish the vinyl overlays of the torso
Perforate all the vinyl overlays so they don't fog up
Make/acquire a gun